Quantcast
Channel: Around the Kampfire
Viewing all 76 articles
Browse latest View live

Bright Ideas! Making the Most of Your Anchor Charts!

$
0
0

I'm joining LOTS of other bloggers in a BIG blog hop to share 
some bright ideas and time-saving tips you can use in your classroom! 
Here are some ideas for making the most of your anchor charts!


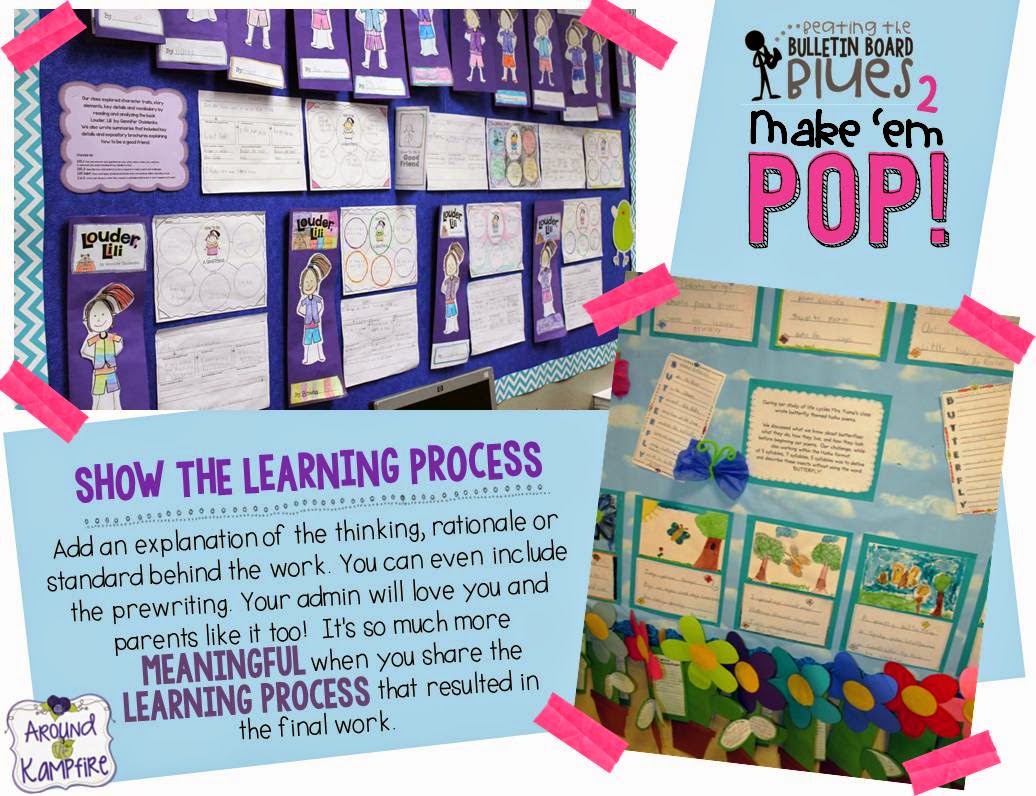
Anchor charts are a wonderful tool to document students' thinking and learning 
and serve as a visual reference of our learning process.  They keep what we are 
currently learning accessible and enable students to make later connections. 
Anchor charts "anchor" our learning, bring focus to a particular strategy 
or standard we are working on and support students during independent 
practice, class discussions or whenever they just need a little reminder.  


For me the most effective charts are FUN and made with my students.  
I sometimes am the 'recorder' for their ideas, questions, 
noticings, and thinking, but I also like to make our charts interactive.  


One way I do that is by making my own sticky notes with construction paper 
shapes that fit the topic or theme of the lesson.  My students love these 
and it's a fun way for them to add their ideas!  
I use removeable glue sticks so that pieces can be moved 
around or sorted.  This also makes your charts easy to reuse!


I also collect all sorts of Post-Its and sticky notes.  You can find seasonal  
ones at craft stores and in the dollar section at Target.
If you have a die cut machine at your school those
work great too!
.


Be flexible.
Let's face it. Some charts can be time consuming to create.  I don't always 
go all out.  Sometimes the need arises and you seize that 
teachable moment by grabbing the nearest piece of paper, making a chart, 
and turning it into an impromptu lesson!  
Other times I plan my charts ahead so that I can reuse them from year to year.  
Those are the ones I gussy up with color and spend more time on.  

Cut that baby up and reuse it!
I've learned to work smarter not harder when reusing my charts.  
Don't be afraid to cut them up and reuse your artwork if you decide to 
take the learning in a different direction!


Love these ideas?  Pick your favorites to PIN and share 
with your teacher friends!

For more anchor chart ideas visit my Anchor Charts board on Pinterest!
Visit the Bright Ideas board for lots of bright ideas for your classroom!

The next stop on the hop is Arlene from LMN Tree.
Hop over for some bright ideas on using poetry to engage 
your struggling readers and ESL students!
You can also search by topic using the link up below
and move along to any blog on the hop! 


Working With Arrays And A Multiplication Freebie!

$
0
0
 Happy almost St. Patrick's Day! 
Here's a fun and easy math idea for working with arrays.


I used little cauldrons I had left from Halloween and turned them 
into pots of gold!
Shhh....The "gold" is Lemon Heads candy. You can also use 
butterscotch hard candy and black salsa bowls usually found 
in most grocery stores. 
They make good St. Patty's Day pots too!


Have your students use the candy to make equal groups.  They then write 
the addition sentence and the multiplication sentence in their math journals or
you can use this little recording page. 


Here's a little pot o' gold writing craft to go along with your math fun.  
This St. Patrick's Day Writing pack includes lesson visuals/printable charts
for 2 mini-lessons on the history of St. Patrick's Day and defining a leprechaun.
It also includes a bulletin board display title card.


We used gold ribbon left over from Christmas to add the "gold touch" 
but you can also use yellow tissue paper.  Simply cut the tissue paper into 
1-2 inch squares and have your students squish them a little and glue them on!


Since I'm on Spring Break I'm on a bit of a roll today! I'm also blogging 
over at Owl-ways Be Inspired!  Be sure to click the button and hop over
 for another fun St. Patty's Day math idea and yep, another freebie!


Linking up with Teaching Blog Addict's Freebie Friday too!
Hop over after and take a look!

Freebie Fridays

It's Plantin' Time! Writing About Science & A Freebie

$
0
0
Graphic by Melonheadz  Background by The 3am Teacher 
Happy Spring!  I am so enjoying our warm spring temperatures!  
Spring weather means plantin' time so last week during Spring Break I spruced up 
my little reading nook, planted all of my pots and finally moved my 
(very messy) fuscia back outside.


 She really needed to get out of the house and look!
She's already blooming! 


It's almost plantin' time in my classroom too! 
We're gearing up to study life cycles and I wanted to share some
 of the fun plant activities that we do! This is one of my very favorite
units to teach and we incorporate a lot of 
writing and hands on fun! 


We germinate lima beans and start by soaking them to observe the inside of a seed. 

 These large beans are perfect for a close up view of the inner workings 
and labeling the parts of a seed.

Last year I placed one under a document camera and my class 
thought it was the coolest thing ever! 


We'll place our seeds between damp paper towels (with a little squirt 
of hand sanitizer to prevent mold) inside a sandwich bag.  
We check on them every couple of days and record any changes. 


We do several mini labs along the way including answering the question,
"How do leaves help a plant get light?"


We looked at different types of leaves and compare their shape, size 
and outer covering.  We predict which leaf types would help a plant 
get more sunlight. We also ask ourselves, "Can we tell how much light 
a plant needs by the type and shape of leaf it has?"

Next, we went outside and students worked in pairs to use their hands 
as leaves to test their predictions and record their observations.  
We demonstrated how different leaf shapes helped a plant 
to get more or less light.


We did this little cut and paste activity during our literacy centers to help us
understand the causes and effect involved in a plant's life cycle.


During our unit we make several mini books to include in our 
culminating project.

In order to manage our time, I spread this out across the curriculum 
and students do some of these activities during our literacy centers. 
Students research plant facts at the computer center or during our
computer lab time, and do some of the writing
during our writing block.

We used these charts to help us identify the parts of a plant and
to understand the process of photosynthesis.  
You can download a free copy of  these charts{HERE} 


We later wrote about photosynthesis and how a plant makes it's own food
 in  mini books that will go inside of our final flower booklets.


We used yarn to make the roots of our flowers before writing 
about the job of the roots.


Students researched interesting plant facts and included them 
on the back of the flower's petals.


We compiled all of our learning and writing in our flower booklets.
My kiddos worked so hard on these and I love how they turned out!


During our unit we learned how a plant makes it's own food and why a plant's
leaves are green.  For some Friday afternoon art fun we "painted" with 
chlorophyll by doing leaf rubbings.


This is our spring hallway display for our open house with our butterfly haiku and acrostic poetry.


I love to tie in art wherever I can and this year we'll be learning about
 Van Gogh's sunflower painting during our plant unit!


 You can find all of these activities and SO much more in my Life Cycle of Plants unit.


Happy planting friends!

Planting Arrays & A Freebie!

$
0
0

Happy Saturday! I hope you're enjoying warmer weather where you are!
 I thought I'd do a quick post and share a little 
impromptu lesson we did last week.


We're reviewing for state testing and since it's plantin' time
in our classroom and in the fields around my school, 
we planted some arrays of corn!


Some of my students are still struggling with the concept
of rows and columns so we
had a discussion about things that are planted in rows and 
things that are held up with columns.
Being close to so many farms where corn, alfalfa and cotton is grown 
made for some good examples and was a huge help in getting
my kids to connect the horizontal and vertical direction of a row and a column. 


Feel free to grab this image if you can use it to help your students!

I had students roll a die and use yellow cubes to build their cornfields.  
Students "planted" their arrays on grid paper and recorded the 
multiplication problem on their whiteboards.


I had students come up to the board and write the factors and product
 in the multiplication sentence frame.


I added this little game and a recording sheet to our math stations so 
students could practice independently. 


If you have kiddos that need help with this concept, or you just need a little
extra something for your math tubs this week click on the 
picture to download the student page or find it  {HERE}!


You can see a lot more of our plantin' fun...
and yep, another freebie by clicking the picture above!


Happy weekend, friends! I'm headed out with my husband 
for BBQ, coleslaw, and corn on the cob!

Student Spaces The Desk Fairy Will Love!

$
0
0


Welcome to another Bright Ideas Blog Hop!
I'm joining 150 different bloggers to bring you
tips, tricks and bright ideas you can use in your classroom!


Don't you love those mornings when you walk in to an
 organized classroom with tidy desks and a CLEAN floor?  
We all know that doesn't ALWAYS happen, but HELLO HAPPY when it does!


My students and I consider our classroom our little home away from home 
and I remind them often that one of their jobs is to keep their "room" clean.  Ha!
Here are some ways I've found to help keep my students and
their spaces clean, organized and running smoothly!

Teach your students how to be organized.
Show them how you expect their space to look.

What looks organized to a 7 year old may look like a hot mess to me! 
I teach my class that everything has a home and there is a home for everything. 
And...we need to keep our house tidy because you never know 
when company is going to come! Ha!

Teach your students at the beginning of the year where to keep things
in their desks. We stack our folders and journals on one side with our 
supply boxes on top. The books students are reading go on the other side. 

These go in the middle and one pencil goes in the "pencil tray." 


Find a place for the little stuff.

I make sure each student has a 5" x 7"  size pencil box. I shop the clearance 
aisles and even garage sales to collect these little gems so I always
have a secret stash in my cupboard for students who need one.
All of the "small stuff", crayons, glue sticks, scissors etc.
"live" in the supply box.


Organize on top as well as inside.
  
As every primary teacher knows, the younger the grade level,
the more "stuff" we AND our students have! Unfortunately,
we need and use EVERY BIT of it!   My desks are arranged in groups we
call teams. Each team has a table box. We keep important odds and ends
students use on a daily basis in these.


Use foam shapes as coasters.

At the beginning and end of our school year, our Arizona temperatures 
can climb well into the 100's. My students often bring frozen or ice filled 
water bottles. I like them to be able to drink water whenever they want to
without leaving their seats, but those frosty water bottles can make 
a BIG SOPPY MESS! Here's a simple solution
I came up with to keep our desks and papers dry....


I use craft foam shapes from Dollar Tree or Michael's on each student's desk.  
Students know that this is where their water bottle lives. Since my teams 
are color coded each table gets the coaster that matches their team color.  
This also serves as a visual for me when calling teams to line up.


Make neatness part of your daily routine.

Each day before dismissal have students do a quick check of their desk and floor 
to make sure everything is tidy and picked up. I make a big fuss over how nice
each team's space looks and what a fresh start they'll have the next morning!


I hope you can use some of these tips to make life run
more smoothly in your classroom!  If you've enjoyed these
bright ideas, I'd love for you to join me on Facebook,
Instagram, or my TPT Store for more great ideas and resources!

Hop on for even more bright ideas from 150 different
bloggers!  Simply browse through the link-up below
and choose a topic/grade level that
interests you!   You can also visit Bright Ideas on Pinterest


Poetry and Painting and Butterflies, Oh My!

$
0
0
I know many of you are on Spring break this week and I hope you're 
enjoying some time resting and relaxing! 

Our spring life cycle study continues and over the next few weeks we'll
be raising butterflies, learning about the life cycle of frogs and writing poetry!


These little guys sure eat a lot and grow QUICKLY!
We used the little journal that came with our 
caterpillars to record their daily change and growth.


While learning about pollination and the part that insects play in 
the life cycle of plants I came across this fun activity on one of my all-time 
very favorite blogs Hope King's Second Grade Shenanigans.
Hope has so many great ideas and this one is perfect for illustrating how 
butterflies and other insects help to pollinate a plant and 
continue its life cycle.  


Each student had a juice box, Cheetos, and a die cut flower.  
The bright colors and smell attracts the butterfly to a flower and students chose 
the flower color that most appealed to them! 


 As my little butterflies landed on their flowers they used their proboscis
to drink a little of the nectar in their (juice box) flower.  Their tiny little 
butterfly feet (their hands) picked up pollen (by touching their Cheetos). 

Next, our butterflies flew around the room and touched all 
of the other flowers which transferred their pollen 
to each bloom they "landed" on.

Last year we made this Butterfly Life Cycle On A String writing craft for students to
write what they have learned about each stage of a butterfly's life cycle.
This year we'll be making the Frog Life Cycle version.

We used beads, chenille sticks and paper to show each stage then students
wrote about each life cycle stage on leaves.   We attached these in order onto 
a piece of yarn and tucked them into the leaf pocket where the butterfly
lays its eggs and the life cycle begins again.


We tied in our poetry unit by writing haiku and acrostic poems about butterflies.


I added a little challenge to this by telling students that while they were 
writing poetry and creating a mental picture about a butterfly 
they could not actually use the word 'butterfly'.
Students used their journals to work out their poems before writing their final drafts.

We used watercolors to illustrate our poems.


We also wrote acrostic poems and used this format to tell a story. 
I reminded students that each sentence did not need to begin 
with the given letter but rather to tell a story 
using the letters to guide them.  


We'll be wrapping up our frog life cycle learning this week 
so stay tuned for our frog fun!
 Have a great week, friends!

Leapin' Life Cycles!

$
0
0
Leapin' life cycles we had fun with these frogs! So far we've learned 
about the life cycles of butterflies, plants, and now frogs. My team 
and I decided we'd use life cycles as the theme for our 
end of year open house and we've been busy thinking of ways 
we can incorporate life cycles across our curriculum. 


We read lots of nonfiction books about frogs and my class wrote 
things they've learned about each stage of the life cycle on
 these lily pad sticky notes.  I drew the shape
then copied it on construction paper.  We used repositionable
glue sticks to turn them into sticky notes. I used clip art
from Scrappin'Doodles for the pictures.


I've been working with my students on how to take notes and determining what 
information is considered important and note worthy.
We watched some video clips on Discovery Education as well as 
on Brain Pop Jr. and students took notes that they would 
later use to write about the frog's life cycle.


One of the things we've talked a lot about is that taking notes means 
writing down important vocabulary, main ideas, and facts rather than 
complete sentences.  This was so tricky for them at first and I'm
so proud of how far they've come!


As a culminating project, we made this
 Frog Life Cycle On A String craft which will be part
of our open house display.


There are two versions of this in the download.  An easy-cut 5-stage cycle
for younger students and a crafty-cut 7 stage cycle. I did a combo of both 
and did a 5-stage crafty-cut since my students are able to cut out 
more elaborate shapes.  Students used their notes to write about each stage 
 in the little lily pad booklets. 


We assembled all the pieces in order on the string glued on some
wiggly eyes (my kids LOVE wiggly eyes!) then added black dots
 to the beads eggs with a Sharpie! Fun, fun, fun!!


Everything tucks into the large lily pad pocket for display and students simply 
pull the string out slowly to reveal each stage!


Here's a little look at the 7-stage version.


If you're looking ideas for your life cycles unit and need some frog fun
click any of the pictures to find this in my TPT shop!

Office Staff Appreciation Freebie

$
0
0

We wouldn't make it a minute at my school without our wonderful
office staff.  They are the first responders for all the little ins and outs and 
unexpected events that naturally happen when you work with children.  
They truly are the glue that holds it all together
and we can't thank them enough!


Here's a little way to treat your office staff to lunch, and say 
thanks for all you do!  I attached In-N-Out Burger gift cards to
this fun little tag but a gift card to any favorite lunch spot would do!


Graphic Novel Style Memory Books for K-3!

$
0
0
 My end of year To Do List is long I tell ya!  We've been busy, busy, busy
reviewing for our last quarterly benchmark, getting everybody's
end of year literacy assessments done, and finishing up projects
for our open house!   My class is getting pretty squirrely and we're all 
about ready for summer!

One of the ways I keep everybody on track and still learning 
is with these end of year memory books!


Friends, these aren't your Mama's memory books! 
Designed in the style of a graphic novel your class will love
these end of year memory books for K-3 include LOTS of fun ways 
for students to showcase their memories as well as their learning. 
Students have FUN writing about their favorite events and activities, 
highlighting their learning superpowers, as well as writing and drawing about the 
powers of friendship, laughter, celebration, kindness, and respect.  
I've also included "show what you know" pages for each core subject to 
keep it academic and help your little superheroes review! Use all of the pages or 
pick and choose the superpowers you want your students to remember most!
Click on any of the pictures to take you to 


Memory Book Gr. 2-3

Here's a little peek at all of the pages!

This little writing craft compliments the memory book and makes 
a great open house display!


Students write an accomplishment or ability they are proud
of on the lightning bolt.  Inside the chest is a booklet for students to 
write about their goals and accomplishments, why they are proud 
of them and how they developed their learning superpowers!


I've had lots of requests for a K-1 version and I'm happy to say it's finished and 
posted in the TPT Shop!


I've included a cover for Prep Year for my Australian teacher friends!


Here's a peek at the K-1 writing craft for little Superheroes!
Students write about accomplishments on the lightning bolt!
Inside the chest shield necklace they write about how they met their goals or 
achieved their accomplishments and developed their learning superpowers!


Each of these pieces can be purchased separately
or in a  bundle. Purchasing the bundle saves 
you money PLUS as a little time saving BONUS
I've included printable parent and student gifts!


            K-1 Bundle                                                        2-3 Bundle

Gr. 2-3 gift tags are shown below. The K-1 bundle includes K-1 versions 
as well as Prep Year.  All of the student gift tags are included in 
both color and black and white. 


I hope these help to save you some time, money, and sanity PLUS help you 
check some things off of that long end of year To Do list!

It's a Teacher Appreciation Sale!

$
0
0
Happy Teacher Appreciation Week!
To celebrate, everything in my TeachersPayTeachers store 
is 20% off May 6 & 7.
Use the PROMO Code TPTXO to save an additional 10%!

Don't forget to leave feedback on previous purchases 
so you can redeem your points at checkout and SAVE even more!


Thank you Michelle, for sharing your adorable button!

#fluencyfun!

$
0
0
It's been a bit since I last posted with all of the end of year 
craziness I'm trying to stay ahead of!  Before I show you 
what we've been up to (besides a multitude of assessments, a field trip, 
our end of year open house, hit or miss specials/prep time, report cards,
  IEP and MET meetings, team meetings and after school PD's...yikes!) 
I just wanted to say that
{hashtag}jenjonesisagenius!

 Seriously.
I swooned when I saw her Hashtag Fluency For Digital Natives unit but thought 
maybe my second graders wouldn't "get it".  Oh boy, was I wrong! Ha!  
When I asked who knew what a hashtag was every 
little hand started waving frantically! I guess that was a pretty 
silly question! I forget how savvy they are sometimes!

 I broke out these little ipads to all kinds of ooohs and ahhhhs! As I explained all 
of the fun things they were going to get to do with these my kiddos were practically
drooling! I added all of Jen's brilliant little ways to practice fluency to 
our literacy centers for the week and my class FUH-LIPPED!
Honestly, they were in hashtag heaven!

Partners used these timers and took turns to see how many phrases they could 
read before the sand was gone.  They graphed their progress each time they played.


Students also sorted "hashcards" (as one of my kiddos named them..Ha!) 
 into piles of YES or NO depending on if they could read them correctly. 


My students take home weekly fluency passages so they're very familiar with 
how this works. I used these for partner reading.  One partner read the 
phrases while the other followed along marking any errors then counting 
the number read correctly.  I placed the lists in page protectors and had kids 
use dry erase markers. After both partners had a turn, they choral read
all of the phrases.


This next game was another HUGE hit! Not only did my kids get the biggest 
kick out of what the hashtags said but they LOVE using spinners and highlighters!


Let me back up a minute and tell you that before introducing my class
to all of this awesomeness I was a tad worried that I would undo all of 
my hard work in getting them to use capitals and punctuation each. and. every. time.
they wrote a sentence.  So before I even showed them all of the fun things
we were about to do I showed them this.....


I projected this on my SMARTBoard and made my kids
pinky promise that they would ALWAYS remember these rules!
Feel free to grab this image and use it with Jen's unit.  (Google Docs is
giving me fits so I can't share it as a download but you can copy and paste it 
into a Word doc or Power Point slide and print or project it from there.)

My class will be working on a super fun memory book next week
that is a real keeper!  I wanted a memory book of my own to keep so
I thought it would be fun to make a {hashtag}memory book!
I used Powerpoint and shapes to make the little ipads 
then cut and pasted  my favorite pictures.


Well, my kids were already in bliss over all of this and then I told them about our
 hashtag hop.  Oh. my. gosh!  They laughed and giggled and thought it was
 the greatest thing ever! So we had ourselves a hashtag hop and went to town 
hashtagging all of the fun things we did this year!  


I printed out the pages and set them out on all of the desks.  I made sure I had 
a page for each desk and that each student appeared 2 or 3 times total. 
We moved all of the chairs then students hopped and hashtagged all 
of the pictures.  


 I LOVE how positive and encouraging they are toward each other.  
They had a blast looking back at all of our pictures and remembering 
the fun we've had this year!  


Ending Our Year In A Life Cycle Garden

$
0
0

Oh, sweet summertime! Friday was my last day at school
and before I forget I wanted to share some of the fun things 
did for our end of year open house.  
Every year I take all kinds of pictures of this wonderful event 
but by the time I finish purging and packing up my
classroom I'm too worn out to post them!
I know you can relate!

This year for our celebration of learning we
decided to turn our hallway into a life cycle garden! Our last quarter is 
all about life cycles and insects.  We studied the life cycles of  frogs,
ants, bees and of course butterflies!


We  incorporated a lot of writing...

This one made me giggle...

"If I was a butterfly......I would fly on to my sister's door and listen to my sister 
on the phone." Ha!

This one made my teacher heart happy! I love it when kiddos use the 
vocabulary they've learned in their writing!

We made these little caterpillars to illustrate the stages of a 
butterfly's life cycle.


My teammate made this butterfly writing craftwith her class. 


These were a HUGE hit!  We turned ourselves into butterflies 
to go with our writing.  My kids LOVE it when they get to
use pictures of themselves!  


I took pictures of each of my kiddos then had them cut them out.
I gave each student about a 6" by 8" piece of tissue
paper to fan fold, then we stapled them to the back of
the photo. So simple, easy and FUN!


My awesome teammate made this honeycomb with her class to
showcase their writing about bees.  We've been
working with our students on learning to take notes while reading nonfiction 
as well as watching video clips. BrainPop Jr. and Discovery Streaming are 
perfect for this and we're lucky to have both!  

What's a garden without sunshine?  We made these arrays of sunshine 
from my friend Amanda Madden's FAB-U-LOUS blog Teaching Maddeness

We also made butterfly life cycle booklets to showcase all of our learning. 
I've wanted to pull our butterfly activities together into a unit for my TPT Shop
for a while now.  I'd love to make a companion to my Plant Life Cycle unit and
I've been tweaking this one for two years.  I just can't quite get it to be the way I want it yet!

These are some of the things we did while learning about the frog life cycle. 


I posted a few weeks ago about these little guys. You can see that post HERE.


I love it when our families come to visit.  It's so much fun to see them enjoying all of 
things their child is learning about!

Well, I'm over and out! I hope you all have some rest, relaxation and most of all, 
some fun planned for the summer!  

You're Finally Here! {Book Talk Tuesday}

$
0
0
I've been searching high and low for quite some time now 
for something a little different in the back-to-school book department 
and I FINALLY found it!
I literally got giddy in the bookstore over all of the things 
you can do with this book!

Available on Amazon

Your're Finally Here! is written by Melanie Watt, author of  
Scaredy Squirrel.( Love that Scaredy Squirrel!)
It's about a little bug-eyed bunny of a book character who is 
waiting..and waiting...and waiting..
for his READERS!

When a reader finally opens the book the
 bunny is beside himself!


Then he wonders...


He begins to tell the reader just how long they've kept him waiting!


Long enough to watch paint dry! Long enough to find a needle 
in a haystack! Long enough to gather dust bunnies! (Oh, the idioms, 
and the opportunities!)

He goes on to scold his new readers for keeping him waiting so long
and insists on knowing where they have been.

The bunny begins to make a deal with the reader but gets interrupted by a phone call...


and then HE keeps his READERS waiting! How rude!

I can not wait to read this to my new class on our 
very first day!  Stay tuned and I'll show you all the fun 
things I have planned for this book!

I'm linking up with Mrs. Jump's Class for another Book Talk Tuesday. 


Click on the button if you're on the lookout for new books!
 It's the perfect place to start!

Louder, Lili: A Little Gem Of A Back-To-School Book!

$
0
0
As I said in my previous post, I'm always on the lookout for
new books (or ones I haven't yet discovered!).
 Especially those I can use at the beginning of the year.
(I'm still waiting for Natasha Wing to write 
The Night Before Second Grade ha!). 

Last year I discovered this precious little gem of a book called
  Louder, Lili by Gennifer Choldenko. It is so perfect for those back-to-school 
discussions on friendship, kindness, and noticing how what we say 
and do makes others feel. Lili is so shy and soft spoken that her voice 
is never heard until one day she finds the courage to speak up to help a friend.

Available on Amazon

  My class really connected with this character last year and we had 
some great discussions about respect, standing up for what is right,
being a good friend, and finding your own voice.  

I found this great little book trailer on YouTube
made as a class project to give you an idea of
what it's all about.


This book lends itself to so many different teaching points and this summer 
I put together a book companion unit with all of the things we did with it plus 
LOTS of things I plan to do this year.  


I thought I would do something a bit different this time.  We all have such 
varying teaching styles, student abilities, and let's face it district mandates, 
that I wanted to create a unit that was extremely flexible with several formats 
that could be used in multiple ways.  Whole or small group, in literacy 
centers, or included in interactive notebooks. I've included work
with story vocabulary as well as a comprehension and vocabulary 
assessment with answer keys.  Each color activity also comes in a
blackline version and I've added printables not pictured here for story mapping,
working with synonyms, abc order, and a fun little "Hamster Hop"
to get your kids moving while reviewing or practicing parts of speech.


Many of the activities can also be compiled into a booklet 
and used as an assessment or an open house display.


I try to work smarter, not harder so I'll be using some of these over 
the first few weeks of school to introduce how we use our supplies, begin to 
establish our routines and procedures for working whole group and in our 
literacy centers, as a back to school writing baseline to keep in student portfolios, 
and  as skills review from last year. 

Week three we begin to focus on characters.  Their traits, relationships with 
other characters, how they respond to events in the story, and
how they change because of these events. We also begin
to really work with our kids on providing evidence and explanations for
 their thoughts and answers.


Feeling "chart challenged"?  No worries! I've included 
all the chart parts you need plus a graphic organizer for students to use.

I've even included  retelling and complete sentences crafts to practice 
or review these important skills. I'll be using the retelling craft
to focus on important details in the beginning middle and end of the story 
with special attention paid to writing complete sentences and using punctuation.
I know I won't have time to do this in one fell swoop so I'll 
save the hamster craft for some Friday afternoon fun then add
it to our writing.

Here's a little peek at the whole shebang...


                                      Psst...Be sure to add this to your cart so you're ready 
for big Back to School Sale coming soon on TPT!

Back To School Sale!

$
0
0

It's back-to-school sale time!
Everything in my store will be 20% off Monday and Tuesday
August 4-5. Save an additional 10% with the PROMO Code: BTS14


Here's a peek at some of my most popular back-to-school resources!


Goal and accomplishment writing craft

Check out my brand new back to school unit, 


Here's how you can save even more!
Be sure to go back and leave feedback on all of your previous
 purchases to earn rewards points.
Reward Points+  PROMO Code BTS14= BIG SAVINGS!


Hop on over to Bog Hoppin' to check out many more stores on sale!

You're Finally Here! {Our First Week Back}

$
0
0

I've been waiting and waiting, printing and prepping, plotting and planning for my brand new class.  I've looked so forward to meeting them, putting faces to their names and welcoming them to second grade. The pencils are sharpened, their desks are arranged, our room is all ready but where are they? What's taking them so long?

Meet the teacher night finally arrived.  My shiny new second graders 
approached their new classroom to this...


Then something happened that has never happened before. 
Every.single.child asked me about that book.  No one was shy, 
no one was nervous, no wanted to know where their desk was.  
But everyone, with their bright little eyes opened wide, asked me,
 "When can we read the book?" 

And finally, after so much waiting, it was our first day! 
They're here!  They're here! They're finally here!


And we read our book.  The very first thing before anything else.
And then I asked....."What took you so long?"


I know our little bunny friend was bored, but not me.  I was busy!

As a little getting to know you activity after reading the book, all my 
new friends turned to a neighbor and explained what took them 
so long to get to my class.  The giggles were priceless!
I have to admit, my class had some pretty good reasons for keeping me waiting!


We made these little booklets so they could explain.
While they were working I took some first day photos.


Later that day we played "The Bored Game" so my new friends could 
connect, compare stories and find things they had in common. Hilarious!


On Wednesday, my kiddos chose their favorite reason from their 
booklets and wrote it in a speech balloon for our bulletin board.


Then to get to know them a little better we all did this....
 On Thursday, we talked about idioms and found lots of them in our book.  

We worked in groups and roamed the room to figure out the 
answers to some of these questions!


Our new friend the book character bunny talks about
how unfair it is that his readers keep him waiting. As unfair as having 
to go to bed when you're not tired!
So to introduce our journal writing routine and to take a baseline 
writing sample I gave them this prompt.


On Friday, I finished our bulletin board at lunch .......


and sent everybody home with a first day keepsake card!


If you're not completely in love with this book yet, 
you will be after you watch this{so stinkin' cute}video clip!
(Thank you for sharing it with me Jennifer Ayers!) 


If you'd like to do all of this with YOUR class you CAN!
I've bundled all of our fun, into a little unit you can see {HERE}
I've included LOTS more not pictured in this post,
plus all the chart and bulletin board parts and templates you'll need!

Just click {HERE} or on the picture to head right to it!


Well, I already love my new class!  How was your first week back?

Beating The Bulletin Board Blues!

$
0
0


I'm linking up with another Bright Ideas Blog Hop to bring you some time saving
 tips to help you beat those back to school bulletin board blues! 


When setting up my classroom I like to hang my boards first, before moving any 
of the furniture. Use the empty floor space to lay out your paper or fabric to help 
visualize where you want to place your boards on the wall.  Keep in mind the other
 things you'll be adding around the boards such as pocket charts and posters. 
You don't want to have to move them once they're up!


Putting up bulletin boards at the beginning of the year can be a real workout!  
Not to mention a little risky as you teeter precariously on any available 
surface so you can hang that top trim! The most time consuming part for me 
is climbing up and down a zillion times to see if they're straight.
This little tip has saved me a TON of time!


This year as I was using my handy dandy level necklace my teammate 
wandered in and said, "I was hanging pictures this weekend and
 I discovered I could put a level on my phone." I never even thought of that!


Most teachers know that fabric is a great alternative
to butcher paper.  It doesn't fade and is super easy
to store. I get most of mine at Wal-Mart or on 
clearance at Hobby Lobby or my local fabric store.


Think ahead about holidays, themes and content 
you'll be displaying in your hallway.   
Layer your fabric or paper to save time when changing them out. 
 Simply remove the top layer and replace the border. 


At the end of the year, store all of the parts and pieces for boards 
you know you'll use again together.  Make yourself a little board-in-a-bag 
so it's all there and ready to go.  I've even taken a quick picture a time or two to
 remind myself  how I had it set up.

 Often times our custodians aren't finished cleaning when we report back.  
We sometimes have to wait for the carpets to be cleaned before we can 
set up furniture.  Keep your bulletin board supplies in an easy to reach place 
so you can use that time to get started on your walls. When stuffing things into 
cupboards at the end of the year I always pack my bulletin boards LAST 
so I can get to them FIRST!

I hope you've enjoyed these tips and found an idea or two you can use!
You can see Part 2 of this little series by clicking on the image below.


 For LOTS more ideas for decorating your boards 

 I'd love to have you join me on Facebook, and Instagram too! 
 Be sure to scroll through the links below for more Bright Ideas 
from 150 other teacher/bloggers!

Happy Back-To-School teacher friends!

A Girl's Gotta Have A Good Pen {Five For Friday & A Teacher Friend Freebie}

$
0
0


Happy Friday, teacher friends! I'm linking up with Doodlebugs Teaching
for anotherFive for Friday! Here's a little peek at my week...


I have to say that I'm loving these Frixion pens!
Fine line and erasable!
I found mine on Amazon.


If you're not already, you soon will be, deluged with running records, 
phonemic awareness and phonics screeners, high
frequency word checklists and grading baseline writing assessments.
Am I right? 


Every day at lunch we compare notes on how many we have left!
I am not winning.

I made these for my teammates (because they think I'm funny)
and to remind them of Rule Number 1:
A girl's gotta have a good pen when she's checking marking like a maniac.


 We wrapped up our Louder, Lili book study this week.  
I love this book! It is the perfect beginning of the year story for talking 
about kindness,being a good friend, standing up for what is right 
and treating others the way you wish to be treated. We reviewed 
all sorts of skills with it and my class really connected with these characters.  
They were mortified by how one of them tries to treat the class pet!
I overheard them talking about it all week!


  Last week we did this Math About Me activity and defined 
ourselves using math!

   I got the nicest email from Gail Collins, a middle school counselor, 
to share how she used my Superhero Writing Craft 
for a back to school career counseling display!

How creative is that? I love the message!  Thank you for sharing this, Gail!

 Our center rotations are in full swing.  I wanted to do 
something different in my poetry center this year so we're doing it


Jen has a great poetry station routine that I just love!
A little fluency practice, a little sound/spelling pattern identification or skill
practice with a highlighter (Pure kid-joy!), spelling practice, illustrating and labeling
 and VOILA!


I've since added having students write sentences using the words from their list
 on the back for some of my kiddos.
and find them HERE.


I introduced this center routine with a sweet little poem by Kristin Smith
from A Day In First Grade. I purchased this poem with 
her I Can Be A Pal  pack. It tied in perfectly with our 
how to be a good friend writing.

Just like Jen, I typed up the poems I wanted to use
from Scholastic's Big Book of  Phonics Poems plus some other random 
poems I've gathered over the years. You can purchase 
the Scholastic book HERE.


I had a parent copy and cut the whole year's worth and all I do is 
change the poem each week. I love easy!


  And since I also love these silly Hey Girl's so much 
I'll leave you with this...


Be sure to stop by Doodlebug's for lots more
Five for Friday!


Have a restful weekend, friends!

Find Me For A Freebie!

$
0
0
Happy Sunday friends!  I'm over at Owl-ways Be Inspired today with
some fun book ideas and a freebie for teaching about cause and effect!


Head on over and check it out!

Beating the Bulletin Board Blues 2: Make 'Em POP!

$
0
0

Welcome back to another Bright Ideas Blog Hop!


Last month I shared some time-saving tips for hanging 
and storing your back to school bulletin boards in 

This time I'm back for part 2 with some fun ideas for making them POP!

Fancy up your boards with butcher paper! It's bright, 
 easy to work with, and readily available!


There are so many fun fonts out there its hard to choose 
which ones to use!  Don't be limited to the lettering you can buy 
at the teacher store.  Customize your boards with your favorite fonts
 in the colors you need.  No more running out of certain letters or having to 
work around pre-made lettering that is too big or too small!  


Your local party aisle has a treasure trove of resources for making 
your boards POP! They're inexpensive, easy to use, and best of all 
easy to store!  The possibilities are endless for what you can do with 
tissue paper, balloons, ribbon, and paper plates!


It is pure kid-joy for my students to get their pictures taken! 
They absolutely love seeing themselves in our displays and showing 
their friends is an added bonus!


It's not always evident how you got your students to where they are now.  
There's a whole lot of teaching that goes into each and every
project your students create. Share that process by including prewriting, 
graphic organizers, notes or journal entries in your bulletin board displays!

I hope you found some tips and ideas you can use in your classroom!

You can see Part 1 of this little series by clicking on the image below.


For more Bulletin Board Ideas visit my board on Pinterest!
Follow me on Facebook  or Instagram for teaching ideas, resources 
and giveaways!

Be sure to hop through the links below for lots more bright ideas! 


Viewing all 76 articles
Browse latest View live